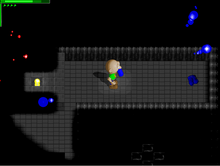
The Tomb of Darkness is the most confusing Tomb, because of the pervasive darkness that covers everything. It also holds annoying Deadheads, purple Boneheads that don't stay dead and chase you forever while interfering with your puzzle solving. It is recommended to come after you have the Flamebringer & Lightreaver,at least.
Now, to kill those Deadheads,you need to stand over their corpses when you do,or kill them in the light?
(But just simple enough to kill them by stepping on their corpses,it works, i tried it.)
There are two puzzles on each side of the tomb that are required to unlock the Planetsmasher, for a total of four.
Now, lets go to the right,since that's the more troublesome part.
Here's the first sign that you need your Flamebringer decently leveled and should not be here if you are underlevel and equipped,a dark watery room filled with Lazybones.
I recommend Level 8 Flamebringer,otherwise,you need some means of killing the Lazybones fast,yet able to dash through without falling into the water in the room. Hit the Lamp at the exit of the room to disable the water and light it up.
For the Glarch pond,it's currently locked,so just ignore it and go all the way to this puzzle.
Now, you need to manipulate the puzzle to make it say Open Sesame,by which you need to flip the alphabets until you get NODM,then flip everything one alphabet forward and 3 zombies jump at you,mash them and flip the red switch at the far end to release one of the gates blocking the Planetsmasher.
Now,on the top right is the moving light cylinder puzzle. It's dark like the Maze, but stepping on a particular silver tile at the beginning of the puzzle generates a cylinder of light that moves quickly but changes direction to wherever you're facing. You have to guide the cylinder of light through the puzzle to light up the path and get through
Next,you have to do another round of that light barrel puzzle again,except guide that light barrel to gate.Upon unlocking it,a bunch of The Beetles come at you,so watch out.
Flip the Red Switch to take down another gate and unlock a shortcut to the entrance.
Now,before you go forward,head over here and you will be warped to a dark place.Hope you have energy to spam the Flamebringer until you hit a Zombie to light up the area. Once you do,flip this switch here to unlock the Glarch pond that was blocked off earlier.
Now,moving on back to the tomb entrance,
On the left is the Maze of Madness, whose exit is on the upper left corner. The Maze is totally dark, unlike the only mostly dark rest of the tomb, but there are four silver blocks in the middle that light up to show which way you can move. Or just follow this picture out.
Now that's done, a shortcut will unlock so you dont have to deal with this madness again.Head on to the next room and flip the red switch.Now watch out for intangible enemies called The Darkness(Basically invisible The Beetles) Just keep you distance and mash them until all are gone,flip the red switch and move on.
Mash the zombies in the watery room,then head on and solve this puzzle.Once it's done,flip the red switch to toss down another gate.
Next,go to the most left corner.As you can see, there are Starey Bats,which,in this environment,will exert force on you and due to the cramp environment of this tomb,can get you stuck in a tight corner.So be careful when navigating this part.
Ahead,you see there's a lazer being fired,this is where the Lightreaver comes in,equip and use it on the lazer to destroy it's turret.(Not to say you can't squeeze through where we need to go without the Lightreaver,but again,the Starey Bats.)
Next,you have to cross this deadly mud maze on a extremely thin path.
Now, this is where this is one of the most annoying puzzles ever made. I really hope you have at least gathered 10 candles and bought the Solar Collector.It is quite impossible to cross this path without some kind of light.
If it wasn't already obvious, you need to be able to use the Flamebringer to shoot out the smoke pellets to light your way around. The Solar Collector allows you to regen energy needed to do that even if you run out.
Once you are done,flip the red switch and go back to the Entrance.Behold the Planetsmasher and Journal entry 10.
Before you leave,equip the Planetsmasher and use it's special ability while on the purple tile,you will warp to The Dumb Side,then use it again on the other purple tile to find yourself at another part of the Tomb.Grab the Candle,then step on the tile to be warped back to the entrance.
Dark Water Room (2 Candles)[]
South of the light cylinder puzzle is a watery room with lamps that can be lit with the Sparkthrower. This gives a candle.
Darkness Earsplitter Coil (Pants)[]
You need to use the Earsplitter here to get this Pants.Watch out for the Darkness waiting inside this room.
Dark Water Room (2 Candles) Edit[]
South of the light cylinder puzzle is a watery room with lamps that can be lit with the Sparkthrower. This gives a candle.
Dark Water Room (2 Candles) Edit[]
South of the light cylinder puzzle is a watery room with lamps that can be lit with the Sparkthrower. This gives a candle.
Dark Water Room (2 Candles) Edit[]
South of the light cylinder puzzle is a watery room with lamps that can be lit with the Sparkthrower. This gives a candle.
Dark Water Room (2 Candles) Edit[]
South of the light cylinder puzzle is a watery room with lamps that can be lit with the Sparkthrower. This gives a candle.


